
Kishin of Trekspace and Klingonspace once made a comment about a sequel she had written to the TOS episode "The Trouble With Tribbles". Her story involved lots of Gorn hatchlings running amuck on the Enterprise, which I thought was a funny idea. A Gorn hatchling would be a nice addition to any Trekkie collection, no? In short, this is what I spent my 2010 Easter doing:

I emptied a plastic candy egg and used it as a start for my Gorn egg sculpture. I separated the base from the egg in order to make the casting of the molds easier (read on brave traveller, you'll see what that's about shortly). The egg base was covered with pebbles from my yard to imitate what I imagine would be a nice reptillian egg nest.

The molds for both base and egg, and later Gorn hatchling, were made out of silicone. The egg base was encircled with a clay wall. The silicone was then simply poured in and allowed to find its level.


A different approach was necessary for the egg part. It was turned on its head and stuck in a lump of clay. I didn't need the whole egg, just the lower part. A thin layer of silicone was first poured on the egg sculpture. Two more layers were added with a mix of silicone and thickener. A clay wall stopped the silicone from splashing out all over the place.
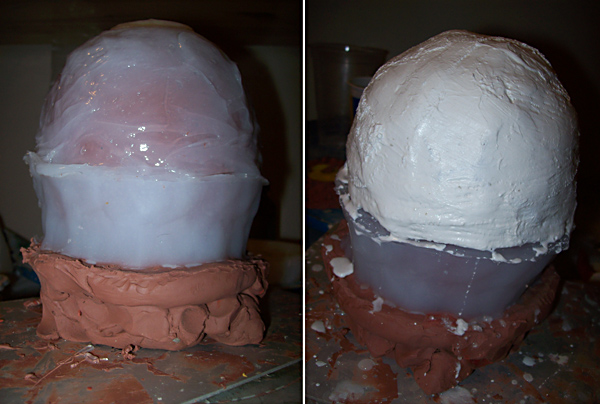
When the silicone was thick enough I could remove the clay wall and add a support shell made out of plaster bandages. This will help the elastic mold hold its shape while casting plastic in it.

The egg is supposed to be hollow and perfectly smooth on the inside. This meant it'd have to be "roto-casted". You pour the plastic into the mold and turn it, turn it, turn it, rolling the plastic around along the walls until it starts to set up. This procedure is repeated about three times; Then the plastic shell is thick enough.

And this is the result. The top of the egg is cut and sanded and the two parts joined together.

I painted the egg and the base with acrylic airbrush paints. It's quick and it's possible to add lots of subtle shades this way. I should clean up my airbrush more often.

I didn't know how much of the Gorn baby would be visible while peeking out of its egg, so I decided to sculpt the whole thing. The eyes will be added later as a pair of knobbly buttons, so I just made sure there was enough space for them.

Again; Another approach for making the mold. This time I gradually built up a clay cradle around the sculpture. Eventually I could just pour the silicone into the cradle when it was large enough.

The sculpture came out in bits and pieces. I only had to cut a small bit on the silicone mold to remove all the clay.

The Gorn baby was also roto-cast into a thin plastic shell. Hard polyfoam was then added to make the casting solid, but very light. Another dash with the airbrush and the Gorn is ready for its eyes and its egg shell.

The eyes are plastic buttons painted with metallic spraypaints. They are glued in place with hot-melt glue. I also used this glue to secure the Gorn to the bottom of the shell. I think this project was a pretty suitable pasttime for Easter, just a different kind of egg craft! Are all these materials expensive, you may ask? They're a bit pricey when you buy them in bottles and cans. But they last very long and are quick and easy to use. I made the Gorn hatchling in four days, with a bit of slacking every once in a while.
1 comment:
magnifique !!!!!!!!!!!!!!!!!!!!!!!!!!!!!!!!!!
Post a Comment